前面我们已经成功在Centos6.5主机上搭建了apache+php+mysql的环境了,接下来在此基础上搭建一个wordpress的个人博客网站。
系统:Centos6.5(x64)
最小化定制安装:base、editors、development librarys、developement tools、x software development、system tools
防火墙关闭,selinux=disabled
环境:apache2.2.31+mysql5.1.73+php-5.6.12
博客环境:wordpress-4.1-zh_CN.zip
检查环境:
[root@backup_server log]# ps -ef|grep "httpd"
root      2134     1  0 14:53 ?        00:00:02 /application/apache2.2.31/bin/httpd -k start
www      58728  2134  0 17:33 ?        00:00:00 /application/apache2.2.31/bin/httpd -k start
www      58730  2134  0 17:33 ?        00:00:24 /application/apache2.2.31/bin/httpd -k start
www      58731  2134  0 17:33 ?        00:00:22 /application/apache2.2.31/bin/httpd -k start
root     58995 58836  0 19:40 pts/1    00:00:00 grep --color httpd
查看Mysql是否运行
[root@backup_server log]# ps -ef|grep "mysqld"
root      1173     1  0 11:00 ?        00:00:00 /bin/sh /usr/local/mysql/bin/mysqld_safe --datadir=/data --pid-file=/data/backup_server.pid
mysql     1283  1173  0 11:00 ?        00:00:02 /usr/local/mysql/libexec/mysqld --basedir=/usr/local/mysql --datadir=/data --user=mysql --log-error=/data/backup_server.err --pid-file=/data/backup_server.pid --socket=/usr/local/mysql/tmp/mysql.scok --port=3306
root     58997 58836  0 19:41 pts/1    00:00:00 grep --color mysqld
打开网页:http://localhost 正常返回,说明环境都已经成功运行了。
添加一个apache专用用户:
groupadd www
useradd -s /sbin/nologin -g www -M www
这里创建一个虚拟主机的方式来创建一个配置;编辑apache 的主配置文件
65行左右,更改默认用户和组:
67 User www
68 Group www
vim /application/apache/conf/httpd.conf增加一行;
99 #ServerName www.example.com:80
100 ServerName 127.0.0.1:80
165行左右:加入一个index.php
168 <IfModule dir_module>
169     DirectoryIndex index.html index.php
170 </IfModule>
380行左右:去掉前面的#号
383 Include conf/extra/httpd-mpm.conf
400行左右开启支持虚拟主机设置:去掉#号
400 # Virtual hosts
401 Include conf/extra/httpd-vhosts.conf
我是直接在主配置文件后面加入:
此做法是,由于我们变更了网站的根目录,所在要把这个权限授权一下,要不然会出现403错误的。
423 <Directory />
424     Options FollowSymLinks
425     AllowOverride None
426     Order deny,allow
427     Allow from all
428 </Directory>
保存;
接下来编辑:
[root@web_server log]# vim /application/apache/conf/extra/httpd-vhosts.conf
<VirtualHost *:80>
    ServerAdmin webmaster@dummy-host.example.com
    DocumentRoot "/www/test.58jb.com"
    ServerName test.58jb.com
    ServerAlias test.58jb.com
    ErrorLog "logs/test.58jb.com-error_log"
    CustomLog "logs/test.58jb.com-access_log" common
        ExpiresActive on
        ExpiresDefault "access plus 12 month"
        ExpiresByType text/html "access plus 12 month"
        ExpiresByType text/css "access plus 12 month"
        ExpiresByType image/gif "access plus 12 month"
        ExpiresByType image/jpeg "access plus 12 month"
        ExpiresByType image/jpg "access plus 12 month"
        ExpiresByType image/png "access plus 12 month"
        ExpiresByType application/x-shockwave-flash "access plus 12 month"
        ExpiresByType application/x-javascript "access plus 12 month"
        ExpiresByType video/x-flv "access plus 12 month"
</VirtualHost>
根据自己的情况变更一下网站的存放路径 :
接下来我们创建网站目录:
[root@web_server]# mkdir -p /www/test.58jb.com/
并授权目录
[root@web_server]#chown -R root.root /www/test.58jb.com/
为什么不是apache里的用户呢?这是因为安全,不设置一样可以读取的。
然后把wordpress-4.1-zh_CN.zip解压到目录:/www/test.58jb.com
[root@backup_server ~]# ll /www/test.58jb.com/
total 7172
-rwxr-xr-x.  1 root root     418 Sep 25  2013 index.php
-rwxr-xr-x.  1 root root   19930 Apr 10  2014 license.txt
-rwxr-xr-x.  1 root root     280 Sep 30 17:12 login.php
-rwxr-xr-x.  1 root root    6575 Dec 23  2014 readme.html
drwxr-xr-x.  2 root root    4096 Sep 30 17:37 wordpress
-rwxr-xr-x.  1 root root 7149242 Apr 16 22:08 wordpress-4.1-zh_CN.zip
-rwxr-xr-x.  1 root root    4951 Aug 21  2014 wp-activate.php
drwxr-xr-x.  9 root root    4096 Dec 23  2014 wp-admin
-rwxr-xr-x.  1 root root     271 Jan  9  2012 wp-blog-header.php
-rwxr-xr-x.  1 root root    5008 Nov 27  2014 wp-comments-post.php
-rwxr-xr-x.  1 root root    3088 Sep 30 17:51 wp-config.php
-rwxr-xr-x.  1 root root    2898 Dec 23  2014 wp-config-sample.php
drwxr-xr-x.  6 root root    4096 Sep 30 18:15 wp-content
-rwxr-xr-x.  1 root root    2956 May 13  2014 wp-cron.php
drwxr-xr-x. 12 root root    4096 Dec 23  2014 wp-includes
-rwxr-xr-x.  1 root root    2380 Oct 25  2013 wp-links-opml.php
-rwxr-xr-x.  1 root root    2714 Jul  8  2014 wp-load.php
-rwxr-xr-x.  1 root root   33435 Dec 17  2014 wp-login.php
-rwxr-xr-x.  1 root root    8252 Jul 17  2014 wp-mail.php
-rwxr-xr-x.  1 root root   11115 Jul 18  2014 wp-settings.php
-rwxr-xr-x.  1 root root   25152 Dec  1  2014 wp-signup.php
-rwxr-xr-x.  1 root root    4035 Dec  1  2014 wp-trackback.php
-rwxr-xr-x.  1 root root    3032 Feb 10  2014 xmlrpc.php
这里手工创建一个目录:
[root@web_server test.58jb.com]# mkdir wp-content/uploads/
[root@web_server test.58jb.com]# chown -R www.www wp-content/uploads/
因为我们想最小化权限
接下来在mysql上创建数据库,并授权;
mysql> create database wordpress;
mysql> grant select,insert,delete,update,create on wordpress.* to wordpress@localhost identified by '123456';
mysql> flush privileges;
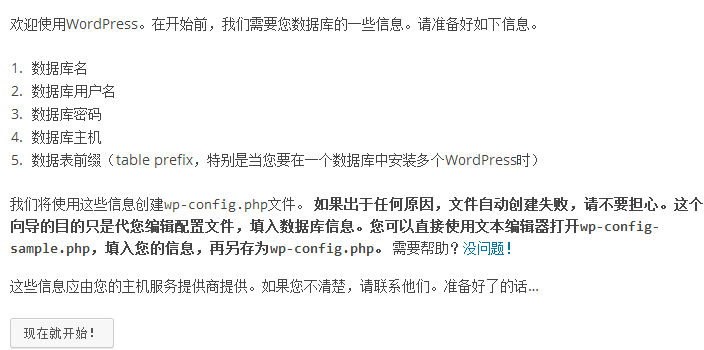
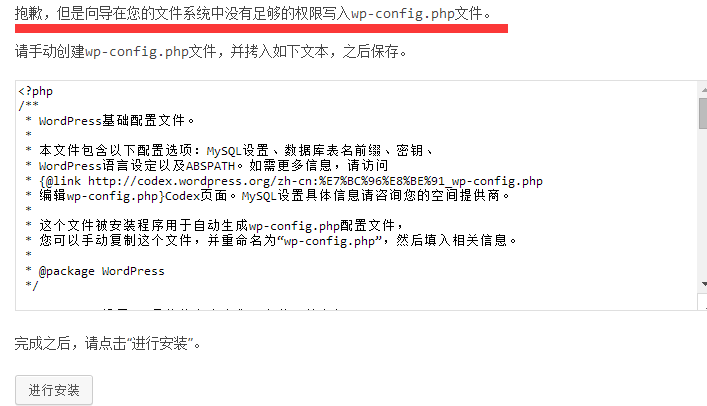
最后打开浏览器;跟着提示操作:

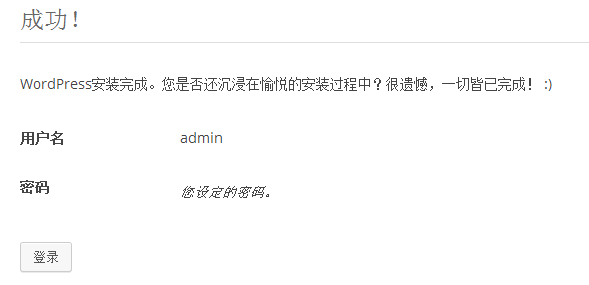
到此,wordpress就安装成功了。至于,怎么修改或者定制wordpress 以后有机会再写个博客分享。