LDAP是轻量目录访问协议,英文全称是Lightweight Directory Access Protocol,一般都简称为LDAP。
ldap应用主要涉及以下几种类型:
信息安全:数据证书、授权管理、单点登陆;
常用ldap为公司入职后的所有员工账号等基础信息库;
如:邮件邮件账号、电脑登陆帐号、办公平台账号、共享服务账号、SVN账号、VPN账号、服务器的账号、无线网登陆账号等
公共账号登陆信息库;可以理解为企业活动目录一样,也可以和微软活动目录打通;
实验环境:
Centos6.5_x86_64
本地环境,添加Hosts解析:
echo "10.0.10.30 58jb.org" >>/etc/hosts
安装所需要依赖包:
yum upgrade nss-softokn-freebl -y
yum install openldap openldap* nss-* subversion *sasl* -y
Yum安装lamp环境;[配置web管理界面]
yum install httpd php php-ldap php-gd -y
复制slapd.conf配置文件:
cp /usr/share/openldap-servers/slapd.conf.obsolete /etc/openldap/slapd.conf
创建管理员密码:
slappasswd -s swper|sed -e "s#{SSHA}#rootpw\t{SSHA}#g" >>/etc/openldap/slapd.conf
salpd.conf 配置修改:[修改或添加]
把配置文件中:dc=my-domain,dc=com 修改成自己的域名; dc=58jb,dc=org ;cn=Manager就是管理员账号;
database    bdb
suffix      "dc=58jb,dc=org"
checkpoint  1024 15
rootdn      "cn=Manager,dc=58jb,dc=org"
loglevel Stats          #增加一个日志记录
cachesize 1000      #缓存大小
快速替换上面关键字;
sed -i 's/dc=my-domain/dc=58jb/g' /etc/openldap/slapd.conf
sed -i 's/dc=com/dc=org/g' /etc/openldap/slapd.conf
把下面这段删除替换成官方的示例:
enable on-the-fly configuration (cn=config)
database config
access to *
    by dn.exact="gidNumber=0+uidNumber=0,cn=peercred,cn=external,cn=auth" manage
    by * none

# enable server status monitoring (cn=monitor)
database monitor
access to *
    by dn.exact="gidNumber=0+uidNumber=0,cn=peercred,cn=external,cn=auth" read
        by dn.exact="cn=Manager,dc=58jb,dc=org" read
        by * none
改成:
access to *
    by self write
    by anonymous auth
    by * read
slapd.conf最终修改后的内容
####################################################################
[root@labor openldap]# egrep -v "^$|^#" slapd.conf
include     /etc/openldap/schema/corba.schema
include     /etc/openldap/schema/core.schema
include     /etc/openldap/schema/cosine.schema
include     /etc/openldap/schema/duaconf.schema
include     /etc/openldap/schema/dyngroup.schema
include     /etc/openldap/schema/inetorgperson.schema
include     /etc/openldap/schema/java.schema
include     /etc/openldap/schema/misc.schema
include     /etc/openldap/schema/nis.schema
include     /etc/openldap/schema/openldap.schema
include     /etc/openldap/schema/ppolicy.schema
include     /etc/openldap/schema/collective.schema
allow bind_v2
pidfile     /var/run/openldap/slapd.pid
argsfile    /var/run/openldap/slapd.args
TLSCACertificatePath /etc/openldap/certs
TLSCertificateFile "\"OpenLDAP Server\""
TLSCertificateKeyFile /etc/openldap/certs/password
database config
access to *
    by self write
    by anonymous auth
    by * read
database    bdb
suffix      "dc=58jb,dc=org"
checkpoint  1024 15
rootdn      "cn=Manager,dc=58jb,dc=org"
loglevel 296
cachesize 1000
directory   /var/lib/ldap
index objectClass                       eq,pres
index ou,cn,mail,surname,givenname      eq,pres,sub
index uidNumber,gidNumber,loginShell    eq,pres
index uid,memberUid                     eq,pres,sub
index nisMapName,nisMapEntry            eq,pres,sub
rootpw  {SSHA}3ZB4msa3hxmp0N/F0YY2I/ssBhZHq5eu
####################################################################
配置数据库信息:[复制配置文件]
cp /usr/share/openldap-servers/DB_CONFIG.example /var/lib/ldap/DB_CONFIG
chown ldap:ldap /var/lib/ldap/DB_CONFIG
chmod 700 /var/lib/ldap
配置rsyslog日志记录ldap的日志;
echo "local4.*          /var/log/ldap.log" >>/etc/rsyslog.conf
/etc/init.d/rsyslog restart
启动服务:
[root@labor ldap]# /etc/init.d/slapd start
[root@labor ldap]# /etc/init.d/saslauthd start
检查ldap的内容:
[root@labor openldap]# ldapsearch -LLL -W -x -H ldap://58jb.org -D "cn=Manager,dc=58jb,dcdc=org" -b "dc=58jb,dc=org" "(uid=*)"
Enter LDAP Password:
ldap_bind: Invalid credentials (49)
上面报的49异常,是因为配置文件的版本问题:
解决方法;
rm -rf /etc/openldap/slapd.d/*
slaptest -f /etc/openldap/slapd.conf -F /etc/openldap/slapd.d/
修改权限:
chown -R ldap.ldap /etc/openldap/slapd.d/
测试一下认证:
slaptest -u
日志检查:
[root@labor ldap]# tail -10 /var/log/ldap.log
再检查ldap的连接测试:
[root@labor ldap]# ldapsearch -LLL -W -x -H ldap://58jb.org -D "cn=Manager,dc=58jb,dcdc=org" -b "dc=58jb,dc=org" "(uid=*)"
Enter LDAP Password:
No such object (32)
上面的返回信息表示成功连接,因为目前ldap上没有配置目录树,所以为空的;
修改httpd.conf配置文件:
sed -i 's@#ServerName www.example.com:80@ServerName 127.0.0.1:80@g' /etc/httpd/conf/httpd.conf
启动httpd服务:
/etc/init.d/httpd start
chkconfig httpd on
安装ldap Web管理客户端工具:[5.0以上要求php要大于5.4以上的]
ldap-account-manager-4.8.tar.bz2
tar xf ldap-account-manager-4.8.tar.bz2 -C /var/www/html
kubernetesmv /var/www/html/ldap-account-manager-4.8.tar.bz2 /var/www/html/ldap
复制配置文件:
cd /var/www/html/ldap/config
cp config.cfg.sample config.cfg
cp lam.conf.sample lam.conf
修改配置文件:
sed -i "s#dc=my-domain#dc=58jb#g" /var/www/html/ldap/config/lam.conf
sed -i "s#dc=com#dc=org#g" /var/www/html/ldap/config/lam.conf
sed -i "s#dc=yourdomain#dc=58jb#g" /var/www/html/ldap/config/lam.conf
授权目录权限:
chown -R apache.apache /var/www/html/ldap
启动httpd服务;
打开浏览器:http://58jb.org/ldap
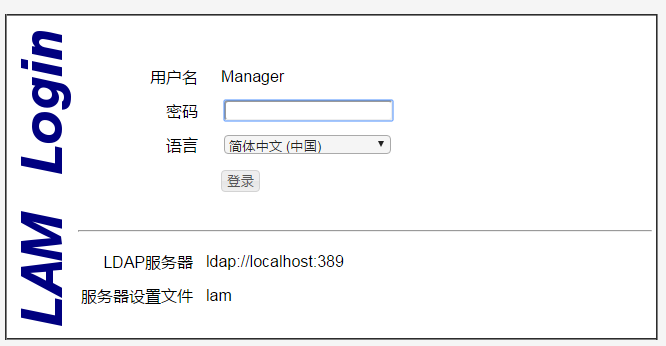
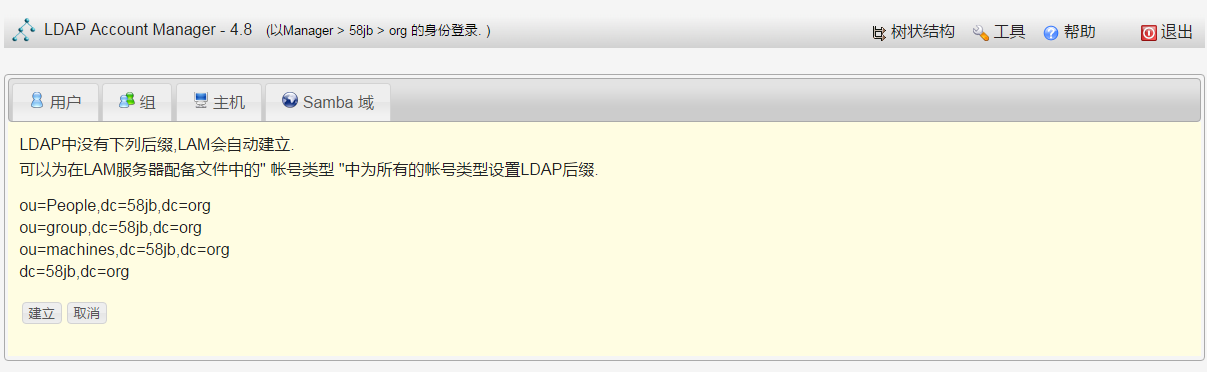
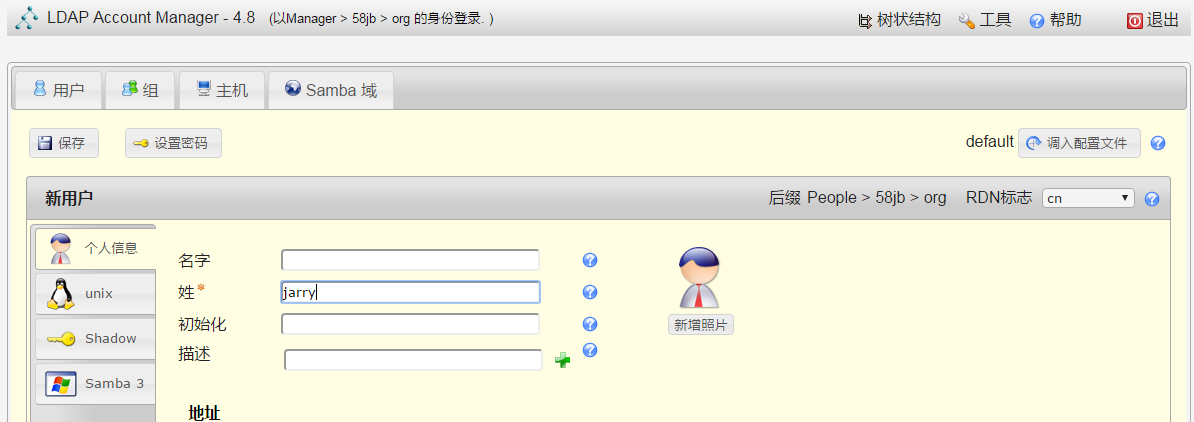
先添加一个组,再添加用户;
再命令行下测试效果:
[root@labor openldap]# ldapsearch -LLL -W -x -H ldap://58jb.org -D "cn=Manager,dc=58jb,dcdc=org" -b "dc=58jb,dc=org" "(uid=*)"
Enter LDAP Password:
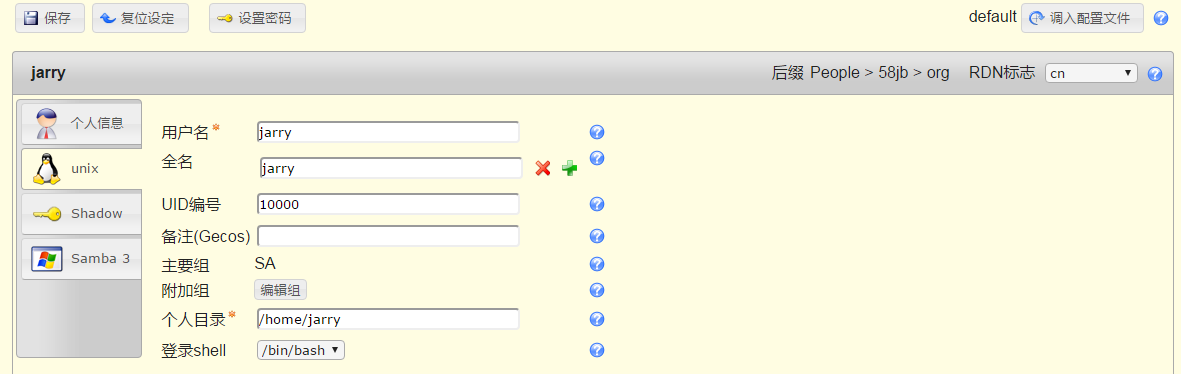
dn: cn=jarry,ou=People,dc=58jb,dc=org
objectClass: posixAccount
objectClass: inetOrgPerson
objectClass: organizationalPerson
objectClass: person
homeDirectory: /home/jarry
loginShell: /bin/bash
uid: jarry
cn: jarry
uidNumber: 10000
gidNumber: 10000
sn: jarry
userPassword:: e1NTSEF9NFNmbkFiaU1Eejl5bW9hMkJKMXhZcUhudXR0UFIyOWg=
svn+sasl通过ldap进行身份验证
1、安装配置svn服务[非apache svn]
2、启用svn服务器的sasl验证机制
SASL全称Simple Authentication and Security Layer,是一种用来扩充C/S模式验证能力的机制。
在Postfix可以利用SASL来判断用户是否有权使用转发服务,或是辨认谁在使用你的服务器。
查看slsl验证机制列表:
[root@labor yum.repos.d]# saslauthd -v
saslauthd 2.1.23
authentication mechanisms: getpwent kerberos5 pam rimap shadow ldap
官方说明:
Authentication Methods
接下来配置通过ldap认证:
通过查看配置文件的说明文档知道:
[root@labor sysconfig]# rpm -qf /etc/init.d/saslauthd
cyrus-sasl-2.1.23-15.el6_6.2.x86_64

[root@labor ~]# rpm -ql cyrus-sasl-2.1.23-15.el6_6.2.x86_64
/etc/rc.d/init.d/saslauthd
/etc/sysconfig/saslauthd
/usr/lib64/sasl2
/usr/sbin/pluginviewer
/usr/sbin/saslauthd
/usr/sbin/testsaslauthd
/usr/share/doc/cyrus-sasl-2.1.23
/usr/share/doc/cyrus-sasl-2.1.23/LDAP_SASLAUTHD
/usr/share/man/man8/pluginviewer.8.gz
/usr/share/man/man8/saslauthd.8.gz
/usr/share/man/man8/sasldblistusers2.8.gz
/usr/share/man/man8/saslpasswd2.8.gz
/usr/share/man/man8/testsaslauthd.8.gz
/var/run/saslauthd
查看man文档,修改;
[root@labor sysconfig]# man /etc/sysconfig/saslauthd
修改配置文件把上面的pam改成ldap:
[root@labor sysconfig]# sed -i 's#MECH=pam#MECH=ldap#g' /etc/sysconfig/saslauthd
修改完成后要重启一下次服务:
[root@labor sysconfig]# /etc/init.d/saslauthd restart
此时再测试一下ldap上的用户:
[root@labor ~]# testsaslauthd -ujarry -p123456
0: NO "authentication failed"
注:此时是无法连接的,因为saslauthd不知道ldap服务器的地址;所以要创建一个配置文件:saslauthd.conf
那怎么知道配置文件创建在哪里呢?通过上面的rpm -qa查询后得知
[root@labor ~]# less /usr/share/doc/cyrus-sasl-2.1.23/LDAP_SASLAUTHD
55行左右;/etc/saslauthd.conf 编写的格式也有;
说明文档里说的文件 /etc/saslauthd.conf 默认是不存在的;
[root@labor ~]# cat >/etc/saslauthd.conf<<-EOF
ldap_servers: ldap://58jb.org/
ldap_bind_dn: cn=Manager,dc=58jb,dc=org
ldap_bind_pw: swper
ldap_search_base: ou=People,dc=58jb,dc=org
ldap_filter: uid=%U
ldap_password_attr: userPassword
EOF
使用ldap上创建的用户jarry就可以成功了;
[root@labor ~]# testsaslauthd -ujarry -p123456
0: OK "Success."
接下来配置svn[非apache的svn]
建立版本库目录:
[root@labor etc]# mkdir -p /data/svndata
创建一个新的Subversion项目;
[root@labor etc]# svnadmin create /data/svndata/api
[root@labor sasl2]# tree -L 2 /data/svndata/api/
/data/svndata/api/
├── conf
│   ├── authz
│   ├── passwd
│   └── svnserve.conf
├── db
│   ├── current
│   ├── format
│   ├── fsfs.conf
│   ├── fs-type
│   ├── min-unpacked-rev
│   ├── rep-cache.db
│   ├── revprops
│   ├── revs
│   ├── transactions
│   ├── txn-current
│   ├── txn-current-lock
│   ├── txn-protorevs
│   ├── uuid
│   └── write-lock
├── format
├── hooks
│   ├── post-commit.tmpl
│   ├── post-lock.tmpl
│   ├── post-revprop-change.tmpl
│   ├── post-unlock.tmpl
│   ├── pre-commit.tmpl
│   ├── pre-lock.tmpl
│   ├── pre-revprop-change.tmpl
│   ├── pre-unlock.tmpl
│   └── start-commit.tmpl
├── locks
│   ├── db.lock
│   └── db-logs.lock
└── README.txt
创建一个统一保存上面三个配置文件的目录:
mkdir /etc/svn
cp /data/svndata/api/conf/* /etc/svn/
修改配置文件:[由于使用slapd认证,本地的passwd文件就可以不用修改了;]
cat >>/etc/svn/authz<<-EOF
[groups]
ldap_user = jarry,tom
SA = svnroot
DEV = swper
[/]
@SA = rw
[api:/]
@DEV = r
@ldap_user = rw
EOF
修改一下svnserve.conf文件:
[root@labor soft]# egrep -v "^$|^#" /etc/svn/svnserve.conf
[general]
anon-access = none
auth-access = write
password-db = /etc/svn/passwd
authz-db = /etc/svn/authz
[sasl]
use-sasl = true
修改配置文件:
sed -i "s@# anon-access = read@anon-access = none@g" /etc/svn/svnserve.conf
sed -i "s@# auth-access = write@auth-access = write@g" /etc/svn/svnserve.conf
sed -i "s@# authzauthz-db = authz@authz-db = /etc/svn/authz@g" /etc/svn/svnserve.conf
sed -i "s@# password-db = passwd@password-db = /etc/svn/passwd@g" /etc/svn/svnserve.conf
sed -i 's@# use-sasl = true@use-sasl = true@g' /etc/svn/svnserve.conf
配置svn通过ldap认证:
[root@labor soft]# ls /etc/sasl2/svn.conf
ls: cannot access /etc/sasl2/svn.conf: No such file or directory
默认此文件是不存在的;
cat >/etc/sasl2/svn.conf <<-EOF
pwcheck_method: saslauthd
mech_list: PLAIN LOGIN
EOF
启动svn服务:
svnserve -d -r /data/svndata/ --config-file=/etc/svn/svnserve.conf
lsof -i:3690   #检查服务是否启动正常
通过sldap上的用户jarry来测试连接;
[root@labor soft]# svn checkout svn://10.0.10.30/api --username=jarry --password=123456
-----------------------------------------------------------------------
ATTENTION!  Your password for authentication realm:

   <svn://10.0.10.30:3690> 838adac5-2da7-4ac9-a1c6-87d6cd7818b9

can only be stored to disk unencrypted!  You are advised to configure
your system so that Subversion can store passwords encrypted, if
possible.  See the documentation for details.

  u can avoid future appearances of this warning by setting the value
of the 'store-plaintext-passwords' option to either 'yes' or 'no' in
'/root/.subversion/servers'.
-----------------------------------------------------------------------
Store password unencrypted (yes/no)? yes
A    ototest/services
Checked out revision 2.
上面表明成功通过了sldap上的用户认证了,因为jarry只有sldap上存在,本地系统是不存在的用户;
Checkout一份版本到本地的test目录:
直接把密码填上:
[root@labor soft]# svn checkout svn://10.0.10.30/api --username=jarry --password=123456
简单操作验证:
[root@labor test]# cp /etc/services .           #添加一个文件
[root@labor test]# svn add services             #加到svn
[root@labor test]# svn commit -m "test file"    #提交
[root@labor api]# svn up -r 1                   #切换版本
SVN简单的启动脚本:[Yum安装后已经有一个启动脚本了,只是因为我们自定义了配置文件路径]
#!/bin/bash
#Author:swper
#Email:hz328@qq.com

svndata="/data/svndata"
config="--config-file=/etc/svn/svnserve.conf"
port=`lsof -i:3690|wc -l`
case "$1" in
start)
        if [ $port -eq 0 ];
            echo "svnserve is not run!"
        else
            echo "Starting svnserve..."
            /usr/bin/svnserve -d -r $svndata $config
            echo "OK"
;;
stop)
        echo "Stoping svnserve..."
        killall svnserve
        echo "OK"
;;
restart)
        $0 stop
        $0 start

;;
*)
        echo "Usage: svn { start | stop | restart } "
        exit 1
esac
至此,整个实验过程结束了!